
How to Use Hitbox in JJS Skill Builder
If you want to make custom moves in JJS Skill Builder, learning how to use Hitbox is one of the most important steps. Hitboxes are what make a move actually connect, deal damage, apply stun, and feel real in combat.
In this guide, you will learn how Hitbox works in JJS Skill Builder, what each setting means, and how to build a simple hitbox that is accurate and balanced.
If you are still learning the builder itself, start with our How to Use JJS Skill Builder guide first. Or check out our How to Make Custom Moves guide for the full move-building workflow.
What Hitbox Does in JJS Skill Builder
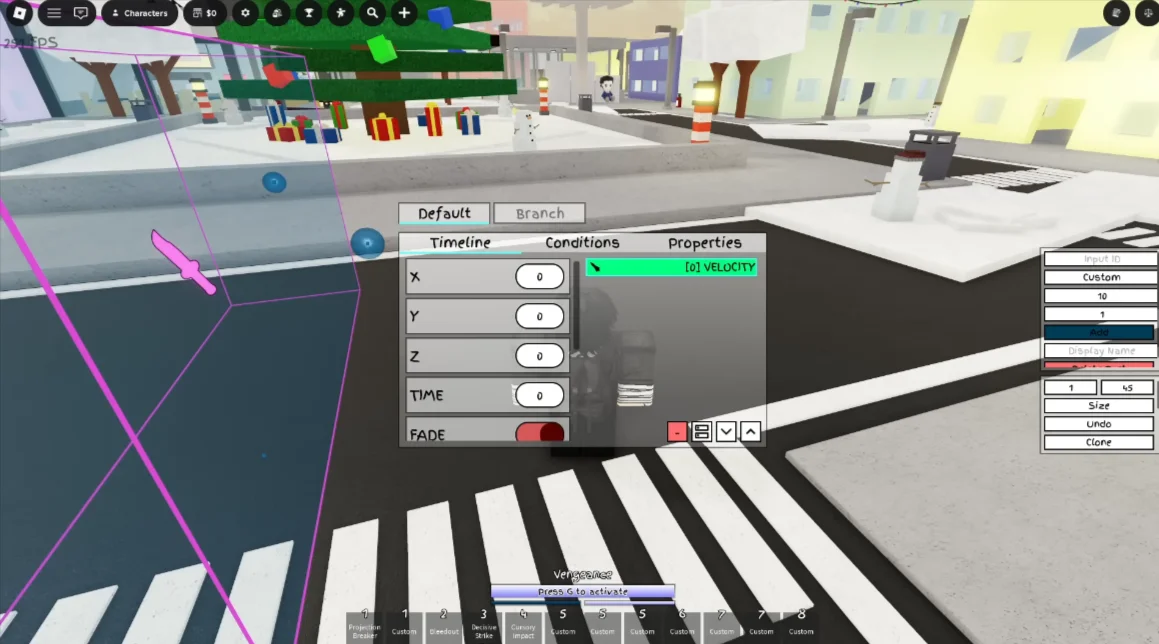
In the tutorial document, the Hitbox node is described as the tool used to create a custom damage area. When selected, it shows a red bounding box, and anything inside that box can be damaged by the move. The user is normally excluded.
That means Hitbox controls the part of the move that actually hits the opponent.
A basic hitbox can define:
- where the move hits
- how large the hit area is
- how much damage it deals
- how long the target is stunned
- whether it feels fair or broken
Why Hitbox Matters So Much
Most builder mistakes happen at the hitbox stage, not the animation stage.
A move can look amazing, but if the hitbox is too small, too early, too late, or placed in the wrong position, it will feel bad in game. The tutorial's parameter list makes this clear because Hitbox has separate controls for position, rotation, size, stun, stun animation, damage, and terrain debris.
That is why good hitbox design is more important than flashy visuals.
The Main Hitbox Settings You Need to Understand
Position
Position changes where the hitbox appears relative to the move user on the X, Y, Z plane.
Rotation
Rotation changes the hitbox angle using yaw, pitch, and roll. For most beginner melee moves, you usually do not need much rotation. But for angled slashes, wave attacks, or special shapes, rotation becomes useful.
Size
Size controls how large the hitbox is. The tutorial specifically notes a useful rule of thumb: if you increase the Z size, you often want the Z position to be about half of the Z size so the box extends in front of the user properly.
This is one of the most practical tips in the whole doc.
Stun
Stun controls how long enemies inside the hitbox are stunned, measured in seconds. This setting is what makes your move combo-friendly, fair, or annoying.
Stun Anim
When enabled, targets damaged by the move will play the base-game hurt animation. When disabled, that animation will not trigger. This affects feedback more than raw power.
Damage
Damage controls how much damage the move deals to targets inside the hitbox. This should always be balanced against size, speed, and stun.
Debris
Debris controls how much terrain destruction happens in the hitbox area. The doc notes that 0 means no debris, while -1 deletes terrain without debris. This is mostly for visual style and map interaction, not basic move function.
How to Build a Basic Hitbox Step by Step
Step 1: Start With a Simple Test Move
Do not begin with a full combo or advanced branch logic. Make a basic test move with one animation, one short wait, and one hitbox. This is the easiest way to understand whether your hitbox settings actually work.
Step 2: Add a Startup Animation
Use a readable startup animation before the hitbox. For beginner testing, choose an animation that clearly shows when the strike should land. Browse our Animation & Sound IDs to find the right animation ID.
Step 3: Add a Short Wait
Use a short wait before the hitbox so the visual swing and the hit timing match.
- 0.1 to 0.2 seconds for quick moves
- 0.25 to 0.4 seconds for slower moves
Step 4: Add the Hitbox Node
Now place the hitbox. Keep the first test version simple:
- medium forward position
- small or medium size
- low-to-medium damage
- short stun
Step 5: Test Position and Size Together
Treat position and size as a pair. If the hitbox is large in front of the player, move the Z position forward enough so the box actually sits where the attack should connect.
Step 6: Add Damage and Stun Carefully
Start modestly. A move that hits reliably with fair damage is better than a broken move that you later have to nerf.
Step 7: Add Feedback
Once the hitbox works, improve feel with sound, better animation timing, and light knockback using velocity.
A Beginner Hitbox Template
Suggested Beginner Goals
- Hitbox appears slightly in front of the player
- Damage is moderate
- Stun is short
- The move is easy to test repeatedly
How to Make a Hitbox Feel Better
Match the hit moment to the animation
If the hitbox lands before the visible strike, the move feels off.
Keep the size honest
A hitbox that is too big usually feels unfair.
Use stun carefully
Long stun may feel powerful, but it also makes moves more frustrating to fight against.
Improve feedback with sound
A clean sound effect often makes even a simple hitbox feel more satisfying.
Common Hitbox Mistakes in JJS Skill Builder
The move never lands
Usually caused by bad position, wrong size, timing mismatch, or hitbox placed too close to the player.
The move hits from too far away
Usually caused by oversized Z size, too much forward position, or bad rotation.
The move feels unfair
Usually caused by too much stun, too much size, and too much damage together.
The move looks wrong
Usually caused by animation timing mismatch, hitbox appearing before impact, or missing sound or feedback.
When to Use Rotation
Many beginner moves can ignore rotation completely. But rotation becomes helpful when you want:
- angled attacks
- wave-shaped strikes
- diagonal launch attacks
- side-cleave effects
When to Use Debris
Debris is not required for most basic moves. Use it when:
- you want terrain impact
- you want a heavier visual feel
- you are making a slam or explosive move
What to Learn After Hitbox
Once you understand hitbox placement, the best next steps are:
- Velocity for knockback and movement
- Branch for alternate outcomes
- Hit Cancel for conditional timing checks
- Variants for more advanced move behavior
Helpful Resources
To improve your hitbox-based moves faster, use these resources together:
- Jujutsu Shenanigans codes — study working examples to understand how hitboxes are used in real movesets
- Animation & Sound IDs to improve feedback
- Planner (Beta) to map the timeline before rebuilding it in game
Pro tip: Browse our JJS codes collection to find working movesets. Copy one, import it in-game, and study how the hitbox is positioned and timed to understand real-world usage.
FAQ
What is the most important hitbox setting in JJS Skill Builder?
For beginners, the most important settings are usually Position, Size, and Stun, because those decide whether the move connects and feels fair.
How do I place a hitbox correctly in front of the player?
A common starting point is to move the hitbox forward on the Z axis. When Z size gets larger, Z position is often best set to about half the Z size.
Do I need rotation for every hitbox?
No. Most simple melee moves can work without much rotation. Rotation is more useful for angled or unusual attack shapes.
What should I learn after hitboxes?
Velocity, Branch, and Hit Cancel are the best next systems to learn if you want more advanced custom moves.
Conclusion
Learning how to use Hitbox in JJS Skill Builder is one of the fastest ways to improve your custom moves. Start with a simple animation, a short wait, and one clean hitbox. Once the move connects reliably, improve it with sound, stun tuning, and better positioning.
If you want more examples to study, browse our JJS codes and Animation & Sound IDs before building your next move.